I am currently working on a project in which we are helping a company transition to using the agile software development methodology. As part of this transition to agile we set up Jira, Confluence, and Zephyr — Jira is used for managing work (epics, user stories, requirements, and test cases), Confluence is a wiki used for managing documentation (requirements, code reviews, etc.), and Zephyr is a plugin for Jira that is used to manage test cases and test case executions. Because the client works in an FDA-regulated environment, we needed to create a trace matrix showing, for each user story, which acceptance criteria map to which test cases. The purpose of this trace matrix is to demonstrate that all of the acceptance criteria (requirements) for a given user story have been tested. While creating such a trace matrix with tools such as Jama does not require any configuration steps, Jira and Confluence do not support creating this table natively. In this post I will describe how I created a trace matrix in Confluence.
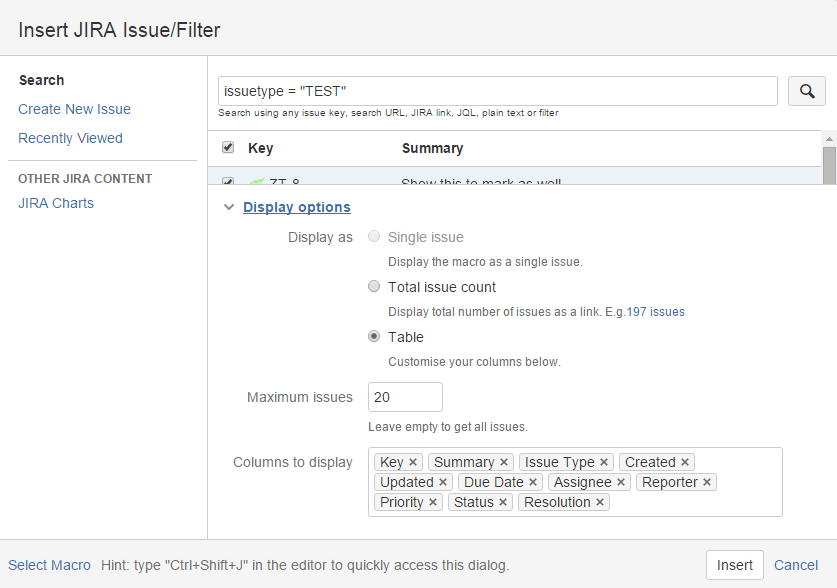
We decided that it would make sense to include the trace matrix in the Confluence page that describes the requirements for a user story, so I started investigating the native capabilities of Confluence. I knew that it was possible to insert a link to a single Jira issue (Insert -> JIRA Issue/Filter); however, I discovered that it is possible to create a table of issues if you select more than one of the issues that appear in the search results. For example, if you perform a very general search (such as all tests) you can then click “Display options” at the bottom of the modal. Choose the “Table” option and then choose which columns from the issues you would like to see displayed in the table. The following screenshot shows you the options that I am discussing:
At first this solution seemed to work, as we can search for all of the acceptance criteria for a story (using the linkedIssues function) and display them in a table. However, there is no way to show the test cases for each acceptance criterion, as the only available columns are those that are part of the issues found by the filter.
I decided to investigate whether it was possible to add a new field to a Jira issue and found the ScriptRunner for Jira plugin. This plugin provides advanced search capabilities and the ability to add scripted fields. The value for a scripted field is calculated by running a Groovy script that pulls information from issues using the Jira API. I used this plugin to add a field called “Linked Tests” which contains the issue ID and description for all tests linked to a given issue. I will include the script that I used at the end of this post. After adding this field I immediately hid it from all views — it duplicates information that is already in the “Linked Issues” section of an issue and should only be used when creating a trace matrix. After adding this scripted field I was able to modify the table to display the “Linked Tests” column, making it a trace matrix.
I will now provide you with all of the information that you will need to do this yourself. After installing the ScriptRunner for Jira plugin you will need to take two steps to add a scripted field:
- Create the field. You can do this by going to Settings -> Issues -> Custom Fields and then clicking “Add Custom Field”. Choose a field type of “Scripted Field”.
- Create the script that calculates the value of that field. Go to Settings -> Add-ons -> Script Fields. Find the field that you created and click the “Edit” button. You will be able to choose the type of information returned by the script and then create the script, either by including the path to a file that contains the script on the server or by typing the script in the “Inline Script” field. You can preview the value that the script returns when provided with a Jira issue ID to determine whether it works before publishing it.
I chose a template of HTML, and then used the following script:
import com.atlassian.jira.component.ComponentAccessor
def issueLinkManager = ComponentAccessor.getIssueLinkManager()
def testList = []
def ISSUE_TYPE_TO_CHECK = "Test"
// Check outward links for tests.
def outwardLinks = issueLinkManager.getOutwardLinks(issue.id)
outwardLinks.each {issueLink ->
if (issueLink.destinationObject.issueTypeObject.name == ISSUE_TYPE_TO_CHECK) {
testList << issueLink.destinationObject
}
}
// Check inward links for tests.
def inwardLinks = issueLinkManager.getInwardLinks(issue.id)
inwardLinks.each {issueLink ->
if (issueLink.sourceObject.issueTypeObject.name == ISSUE_TYPE_TO_CHECK) {
testList << issueLink.sourceObject
}
}
// Concatenate the linked tests and remove the trailing separator.
def returnString = "<ul>"
testList.each {test ->;
returnString += ("<li><a href="\"http://usdvras13.abiomed.com/jira/browse/${test.toString()}?src=confmacro\"">${test.toString()}: ${test.summary}</a></li>")
}
returnString += "</ul>"
// Return linked tests.
return returnString
After adding the scripted field I hid it from the issue view. I did this by going to Settings -> Issues -> Custom Fields. After locating the “Linked Tests” field in the list, I clicked on the “Settings” gear on the right-hand side of the row and selected “Screens”. I then un-selected the checkbox for every screen and then clicked “Update”.
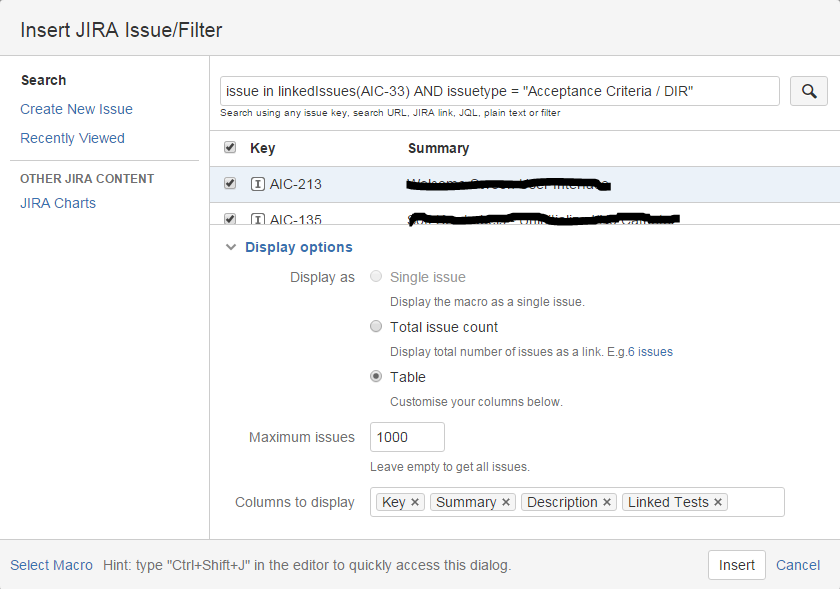
The last step that I took was to add the table to the Confluence page. To do this I went to the edit view of the page to which I wanted to add the table, clicked the “+” sign, and then selected “JIRA Issue/Filter”. I filled in the modal as shown below:
You would of course need to substitute “AIC-33” with the Jira issue ID of the story for which you would like to display a trace matrix.
The last thing that I did was to add this trace matrix to a Confluence template. You can do this by following the same steps for inserting the table while editing the template. You should add a note to the template telling the user that they need to replace the Jira issue ID (“AIC-33” in my example) with the correct issue ID. I was unable to find a way to automatically populate the issue ID based on which Jira story the Confluence page is linked to — this is a weakness of this approach.
This was the solution that I used to display a trace matrix in Confluence. I searched for other plugins that would do this “out of the box”, but was unable to find any. If you know of any better solutions then please let me know in the comments.


4 thoughts to “Creating a Trace Matrix in Confluence”
Hi Jonathan,
i get following Error Message:
2019-12-18 10:40:47,931 ERROR [customfield.GroovyCustomField]: *************************************************************************************
2019-12-18 10:40:47,931 ERROR [customfield.GroovyCustomField]: Script field failed on issue: VNCL-81, field: Linked Tests
org.codehaus.groovy.control.MultipleCompilationErrorsException: startup failed:
Script25517.groovy: 9: expecting ‘}’, found ‘-‘ @ line 9, column 30.
outwardLinks.each {issueLink ->
I´d like to show all Coverage, Testcases, Testresults and Process, similar to the Traceability Matrix Report from Adaptavist Testmanager in Confluence.
Do you have any clue?
Thanks in advance for your help
Best regards
Valerio Vallone
Hi Valerio,
I am not familiar with the traceability matrix report from Adaptavist Test Manager, so I don’t think that I can help you with that specific problem.
I might be able to help you with your compilation error. Can you send me the script that you are running?
Jonathan
Hi Jonathan,
I used your script:
import com.atlassian.jira.component.ComponentAccessor
def issueLinkManager = ComponentAccessor.getIssueLinkManager()
def testList = []
def ISSUE_TYPE_TO_CHECK = “Test”
// Check outward links for tests.
def outwardLinks = issueLinkManager.getOutwardLinks(issue.id)
outwardLinks.each {issueLink ->
if (issueLink.destinationObject.issueTypeObject.name == ISSUE_TYPE_TO_CHECK) {
testList << issueLink.destinationObject
}
}
// Check inward links for tests.
def inwardLinks = issueLinkManager.getInwardLinks(issue.id)
inwardLinks.each {issueLink ->
if (issueLink.sourceObject.issueTypeObject.name == ISSUE_TYPE_TO_CHECK) {
testList << issueLink.sourceObject
}
}
// Concatenate the linked tests and remove the trailing separator.
def returnString = “”
testList.each {test ->;
returnString += (“${test.toString()}: ${test.summary}“)
}
returnString += “”
// Return linked tests.
return returnString
He creates an error Message that he ist expecting in line 9, column 30 a “}” instead he founds a “-“
Hi Valerio,
I unfortunately don’t have an environment in which to test this script anymore. Have there been any changes to Groovy’s syntax; in particular, the syntax around how closures work?
Jonathan